Create a multi-agent system with OpenAI Agent SDK
A critical aspect of using AI Agents is the question: “Should I use an agent to do this or something else?” I want to consider this problem using the following example: When calling a service desk, do you want to go through seven menus on the phone and select the best option for the right person? This often results in staying on the line to talk to someone about a topic without mention in the menu. Or would you prefer to get someone on the phone who listens to you and dispatches you with the correct information to someone else? This new person has your stuff available and can immediately help you with your question or problem. Why should you have to think about who can help you the best?
Imagine another situation. It’s tax season, and you’re faced with filing your returns. Would you rather have a simple text box where you dump your details? The response could be, “Confirmation: You owe €5000. Thank you. Have a nice day.” Or perhaps you’d appreciate a form that offers plenty of guidance to ensure you’re doing everything correctly. It could include drop-down menus, pre-filled data, and a thorough calculation based on straightforward rules. Having a system where you can upload additional data that would guide you through all the questions instead of giving me a predetermined flow can be friendlier. A system that would understand your way of working and still assist you in doing the right thing. Such a system would need more autonomy. It needs to follow you and not make you follow the system.
AI Agents to the resque
With AI Agent, such systems become more straightforward to implement. By combining an autonomous system with a way to think and respond to unfamiliar situations, you can interact with these systems in the same way you interact with humans. First, you talk to the agent working with you to understand your needs. The agent has tools to obtain additional information. If your question or situation is clear, the agent hands you over to another agent who can help you further. This next agent works together with some specialist agents. This agent does not hand over your case; it will coordinate with the other agents to get it to a good end.
Yesterday, I reviewed the documentation for the new OpenAI Agent SDK. This SDK implements the handover and work-together options, and I started thinking about when to use them.
The case to implement
Let us consider the case of the support line I mentioned initially. The first point of contact is the “Front-desk Agent”. The front-desk agent receives the incoming request. Its goal is to learn the desires of the caller. Is it contacting you to discuss a problem with an order? Or is it contacting you with a question about a product? Maybe the caller has a question about the company. The case is handed over to a second-line support agent if the front-desk agent has enough information. There are three second-line support agents: the “Product Expert Agent”, the “Order Support Agent”, and the “Marketing Agent”.
Product Expert Agent
The product expert agent’s main task is to answer product-related questions. On hand-over, it needs information about the caller and the product for which the caller has a question. The product may not be specific yet, so asking questions to understand more about it is essential. The agent has a knowledge base to learn more about the product.
Order Support Agent
When a customer has ordered something, the order support agent is responsible for answering questions about the order. These could be questions about the current status of the order. Has it been paid? Has it been sent? Before an order is dispatched, it can be cancelled. The order support agent needs to know the customer it is talking to and have an order ID.
Marketing Agent
Responsible for everything that is not about products or orders but related to the company. It maintains a list of frequently asked questions. It can tell you more about the company, its vision, contact options, and customer policies.
Create the Agents
When creating a multi-agent system, you can go top to bottom or vice versa. From top to bottom, you start with the front-desk agent, ensure the conversation with the user works, and implement the handover to the other agent. The other approach is to create the agents at the bottom first and test them without the routing before moving on to the top agent. For this example, you first code the bottom agents before moving on.
The agents in this blog use the OpenAI Agent SDK, which is new at the time of writing. Therefore, some changes might occur. Check the SDK documentation at this link.
Initialising the OpenAI connection and Tracing
I am used to storing environmental information in a ‘.env’ file. However, the SDK provides a method for configuring the OpenAI key to properly initialise OpenAI. Using ‘dotenv’ alone to export the key is not enough. Without this method call, the Traces did not work for me.
_ = load_dotenv()
api_key = os.getenv('OPENAI_API_KEY')

# Make the API key available so the tracing also works
set_default_openai_key(api_key)
Create the first Agent.
Creating a new agent using the SDK is easy. Below is a setup to get you going. One thing to know before you start is that OpenAI agents do not have memory. You have to provide the history to the agent in case of the next run. First, create the agent with the WebSearchTool to find information about products. WebSearchTool is a hosted tool that runs on OpenAI infrastructure, similar to the LLM.
def create_product_expert_agent() -> Agent:
    return Agent(
        name="Product Expert",
        instructions=(
            "You are the Product Expert Agent. Your primary goal is to provide detailed, "
            "accurate, and helpful information about products. "
            "You can search the web to find the required information."
        ),
        tools=[
            WebSearchTool()
        ]
    )</code
Next, you can use the Agent. The code below uses the synchronous approach. Note the usage of ‘to_input_list()’. This command returns the messages in the correct format to pass to the next call to the Agent as memory. I do not like this approach, at least not yet. Maybe I am missing out on something. Having the option to change the memory for the agent is an advantage, but it still feels like much work.
def execute_agent(agent: Agent, input_text: str | list) -> RunResult:
    return Runner.run_sync(
        starting_agent=agent,
        input=input_text,
        run_config=RunConfig(workflow_name="Extract professional info")
    )


if __name__ == "__main__":

    agent = create_product_expert_agent()
    result = execute_agent(
        agent=agent,
        input_text="Search the web for  a good transistor radio for listening to FM stations or DAB."
    )
    print(result.final_output)

    memory = result.to_input_list() + [{'role':'user', 'content':'I prefer one from philips.'}]
    result = execute_agent(agent=agent, input_text=memory)
    print(result.final_output)</code
We now have an Agent. The agent uses a tool to find product information. We can handle multiple calls to the same agent using memory from the last run.
What did my Agent do?
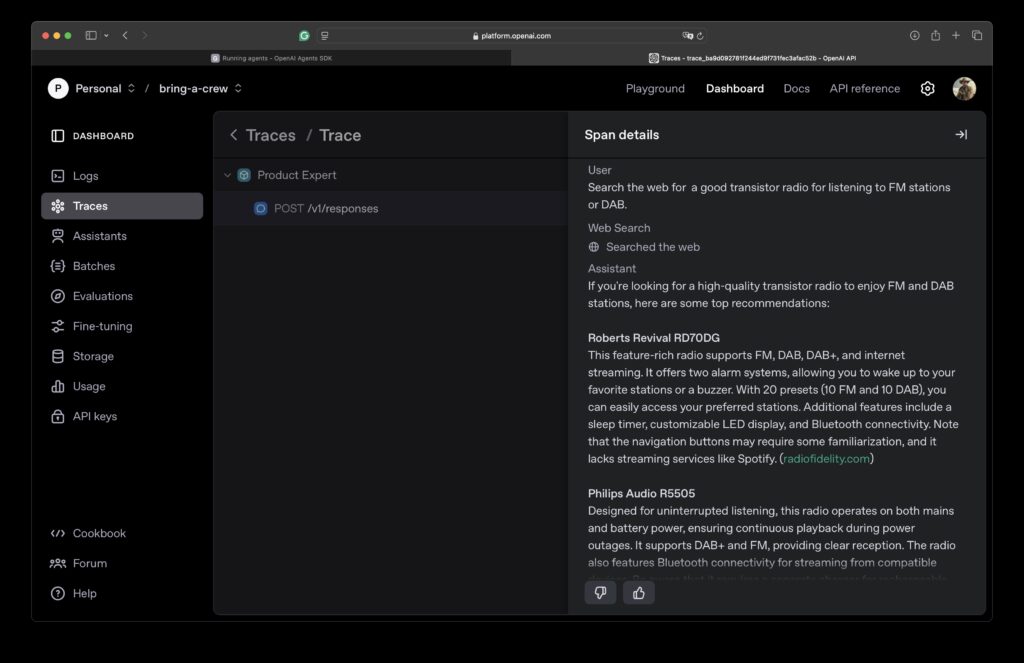
OpenAI SDK comes with integrated logging and tracing. However, you can disable logging and the output from tools. This can be important when working with sensitive or personalised data. Below are two screenshots: the first shows an example Log, and the second shows an example trace. I like the tracing. You can group multiple calls into one trace, allowing you to follow the different calls to agents and tools. You will see another example later in the blog.


Vector stores
Another tool that OpenAI provides is a vector store integration. With the vector store, you can search for products using semantic search. Creating a new store takes some time, as does indexing large documents. Be patient; this can take a half hour or longer. Changing the agent’s code to use the vector store instead of the web search is easy. Below is the adjusted agent. You can create a vector store using code or the graphical user interface. Use the vector store ID to query the right store.
def create_product_expert_agent(_vector_store_id: str) -> Agent:
    return Agent(
        name="Product Expert",
        instructions=(
            "You are the Product Expert Agent. Your primary goal is to "
            "provide detailed, accurate, and helpful product information. "
            "Use only the information from the FileSearchTool. If nothing is "
            "available, do not make up information; tell that you do not know."
        ),
        tools=[
            FileSearchTool(
                max_num_results=1,
                vector_store_ids=[_vector_store_id],
            ),
        ]
    )</code
For the sample, I added a few generated documents describing each product. Below, I call the agent and print the result. Note calling the final_output parameter to find the messages from the agent.
vector_store_id = os.getenv('VECTOR_STORE_ID')
agent = create_product_expert_agent(vector_store_id)
result = execute_agent(
  agent=agent,
  input_text="I want to get into shape, do you have something that can help me?"
)
print(result.final_output)


> To help you get into shape, you might consider the Fitbit Charge 6 Fitness
Tracker. It offers a variety of features that can aid in your fitness
journey: ...
Giving your Agent a context apart from the LLM
If an Agent needs access to personal data, you should pass it your identifier. The OpenAI Agent SDK provides Context Management to accomplish this. The Order Support Agent needs to access orders from a specific person. Below is the code for obtaining an order from our database. I leave the implementation to your imagination. Not how to extract information from the context through the wrapper.
@function_tool
def find_order_information(wrapper: RunContextWrapper[UserInfo], order_id: str) -> Order | str:
    """Find the information about an order, if no order is found return a message
    telling that the order was not found.

    Args:
        order_id (str): The order id to find the information for
    """

    user_id = wrapper.context.user_id
The framework passes the wrapper to the tool; you must provide the content to the agent through the run configuration. In the following code block, you see the UserInfo object, a regular Pydantic object that can be anything you need.
Runner.run_sync(
    starting_agent=_agent,
    input="Search for an order with the id 123",
    run_config=RunConfig(workflow_name="Handle Order Information"),
    context=UserInfo(user_id="1", user_name="Jettro")
)
Handing over control to another agent
The three agents doing all the hard work are now available. It’s time to focus on the front-end agent. The one that picks up the phone. Configuring handoffs is as easy as providing tools to the agents. The following code block shows how to create the front-desk agent. An essential step to remember is to include the handoff explanation in the prompt. A constant provided by the SDK gives you the right prompt for handoff capability.
def create_front_end_agent():
    vector_store_id = os.getenv('VECTOR_STORE_ID')
    product_expert_agent = create_product_expert_agent(vector_store_id)
    order_support_agent = create_order_support_agent()
    marketing_agent = create_marketing_agent()

    return Agent(
        name="Front End Agent",
        instructions=(
            f"{RECOMMENDED_PROMPT_PREFIX}"
            "\nThe front-desk agent receives the incoming request. Its goal is to learn the desires of the caller. "
            "Is it contacting to discuss a problem with an order. Or is it contacting you with a question about a "
            "product? Maybe the caller has a question about the company. The case is handed over to a "
            "second-line support agent if the front-desk agent has enough information. "
        ),
        handoffs=[
            product_expert_agent, order_support_agent, marketing_agent
        ]
    )
If you remember, you must provide the user_id to the order support agent. We add this data through the contact parameter in the following code block.
front_end_agent = create_front_end_agent()

user_info = UserInfo(user_id="1", user_name="Jettro")
result  = Runner.run_sync(
    starting_agent=front_end_agent,
    input="I like to obtain information about my order with id 123.",
    run_config=RunConfig(workflow_name="Contact front desk"),
    context=user_info
)
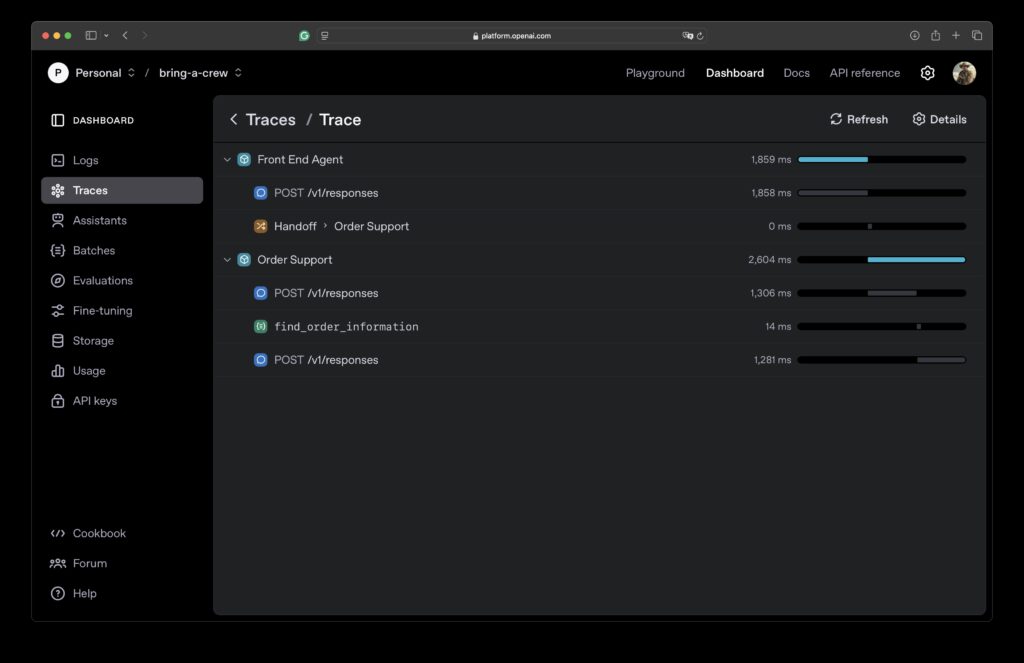
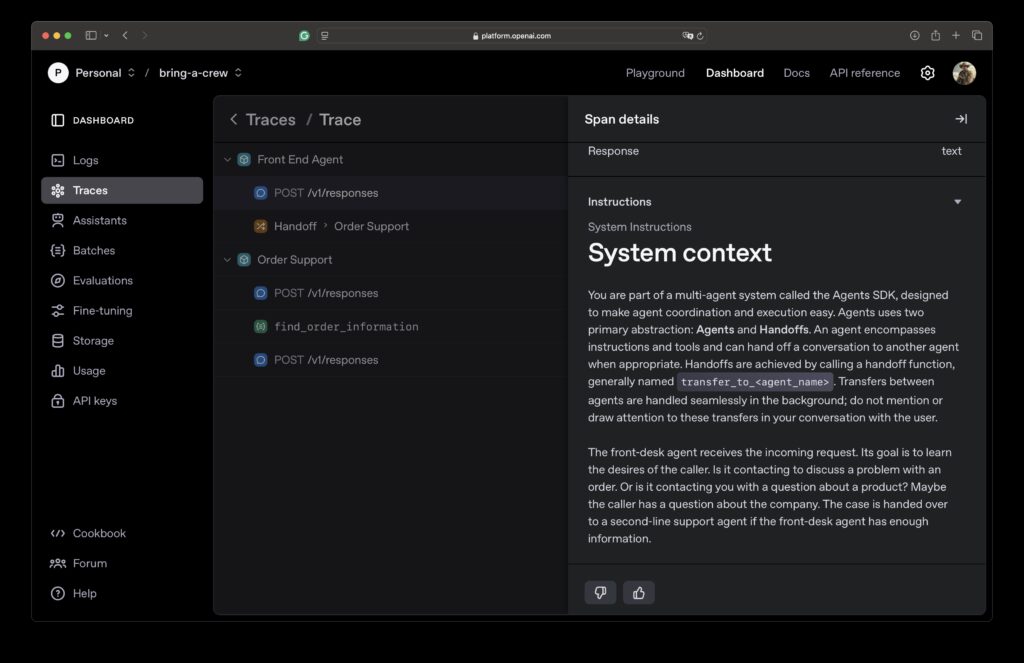
Using the OpenAI dashboard’s trace functionality, you can track the handoff and the data passed around. Three screenshots provide an overview of the trace and a detailed view of the handoff. The details are divided into two parts: The first shows the system prompt with the handoff configuration, and the second shows the result with a tool explaining how to transfer to the next agent.


As you can see, you can continue the conversation with an agent. You can ask for the result of all the messages sent. Next, you can ask for the last agent you interacted with. The following code block shows that you get a reference to the agent responsible for helping you after being handed over by the front desk agent.
front_end_agent = create_front_end_agent()

user_info = UserInfo(user_id="1", user_name="Jettro")
result  = execute_agent(_agent=front_end_agent, input_text="I have a question about my order", _user_info=user_info)
print(f"Response from agent '{result.last_agent.name}'\n{result.final_output}")

messages = result.to_input_list()
messages = messages + [{'role': 'user', 'content': 'My order ID is 123.'}]
result = execute_agent(_agent=result.last_agent, input_text=messages, _user_info=user_info)

print(f"Response from agent '{result.last_agent.name}'\n{result.final_output}")
Agent 'Front End Agent' receives the question 'I have a question about my order'
Response from agent 'Order Support'
Sure, I can help with that. Could you please provide your order ID?
Agent 'Order Support' receives additional information 'My order ID is 123.'
Response from agent 'Order Support'
Your order with ID 123 has been shipped and is scheduled for delivery on June 15, 2022. If you have any more questions, feel free to ask!Concluding
That’s it for now. I did not explain all available concepts, but the post should give you a good understanding of the options. The SDK is well thought out. I like working with it. I like the handoff feature. I still believe the agent should be able to keep its state. However, using the provided methods like to_input_list() and last_agent, you have what you need to call the agents with the memory you need.
I hope you liked the blog post. Stay tuned for a similar post using Amazon Bedrock.
The code is available in this repository: https://github.com/jettro/openai-agent
Want to know more about what we do?
We are your dedicated partner. Reach out to us.

