

Leveraging AWS Step Functions to Orchestrate Your Load Tests, Part 1: Introduction and setup
Most of us build applications to support the business goals of our company. Almost all companies will have the business goal that “the system must continue to function reliably as the business grows”. How do we know that the system will continue to work once we have more users? One way to do this is to perform load tests on your system.
While performing a load test for one of our clients at Luminis, we needed to perform various manual actions before and after the test.
For this reason, we have decided to use AWS Step Functions to orchestrate our load tests.
AWS Step Functions is a managed service that allows you to orchestrate workflows. You create a state machine where each state can perform certain actions and checks. Some examples of actions are running a Lambda function or an ECS service or retrieving objects from an S3 bucket. You can also use states to check the results of the previous state and decide what the next step should be in the workflow. This eliminates a lot of manual orchestration you might otherwise have to do yourself.
In this blog series we create a simple application that we can load test and use a Step Function to orchestrate the load test that will run against this application. This blog series includes step-by-step instructions, however, the result can be found in this git repository.
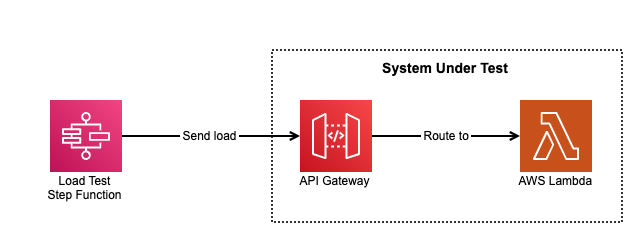
In this first part of the blog series, we focus on creating the system under test using AWS CDK.
Creating our system under test
In testing, we refer to the application or system we are testing as the “System under test” (SUT). In our case this will be an API Gateway with one endpoint that has an integration with an AWS Lambda function. This Lambda function will simply print a log statement when it is called.
Creating the CDK Project
We will be using the AWS Cloud Development Kit (CDK) to build this project. The CDK allows us to use programming languages such as Java to define and deploy our AWS infrastructure.
Be sure that you have configured CDK to use your AWS account before continuing to the next part.
To start, create a directory with a name for the application. I named mine “load-test-step-functions-demo”. Open a terminal, navigate to this directory and run the following command:
cdk init app -language javaThis will create a CDK project for us which we will use for the rest of this blog.
Creating the Lambda Function for the SUT
Now that we have a project, we are first going to create a Java Lambda Function that will be used in our SUT.
Create the following directory from the root of the CDK project:
mkdir -p lambda/src/main/java/com/myorg/lambdaIn this directory, create the file SUTLambdaHandler.java:
package com.myorg.lambda;
import com.amazonaws.services.lambda.runtime.Context;
import com.amazonaws.services.lambda.runtime.LambdaLogger;
import com.amazonaws.services.lambda.runtime.RequestHandler;
import com.amazonaws.services.lambda.runtime.events.APIGatewayV2HTTPResponse;
import java.util.HashMap;
import java.util.Map;
public class SUTLambdaHandler implements RequestHandler<Map<String, Object>, APIGatewayV2HTTPResponse> {
   @Override
   public APIGatewayV2HTTPResponse handleRequest(Map<String, Object> input, Context context) {
       LambdaLogger logger = context.getLogger();
       logger.log("Lambda function has been called!");
       APIGatewayV2HTTPResponse response = new APIGatewayV2HTTPResponse();
       response.setIsBase64Encoded(false);
       response.setStatusCode(200);
       Map<String, String> headers = new HashMap<>();
       headers.put("Content-Type", "text/html");
       response.setHeaders(headers);
       response.setBody("Lambda function has been called!");
       return response;
   }
}
In order to build and package this Lambda into a JAR we can use, we need to add a pom.xml file to the lambda directory. Add the following:
<project xmlns="http://maven.apache.org/POM/4.0.0"
        xmlns:xsi="http://www.w3.org/2001/XMLSchema-instance"
        xsi:schemaLocation="http://maven.apache.org/POM/4.0.0 http://maven.apache.org/xsd/maven-4.0.0.xsd">
   <modelVersion>4.0.0</modelVersion>
   <groupId>com.myorg.lambda</groupId>
   <artifactId>lambda</artifactId>
   <version>1.0-SNAPSHOT</version>
   <properties>
       <java.version>17</java.version>
   </properties>
   <dependencies>
       <!-- AWS Lambda Java Core -->
       <dependency>
           <groupId>com.amazonaws</groupId>
           <artifactId>aws-lambda-java-core</artifactId>
           <version>1.2.1</version>
       </dependency>
       <dependency>
           <groupId>com.amazonaws</groupId>
           <artifactId>aws-lambda-java-events</artifactId>
           <version>3.14.0</version>
       </dependency>
       <!-- AWS Lambda Java Log4j2 -->
       <dependency>
           <groupId>com.amazonaws</groupId>
           <artifactId>aws-lambda-java-log4j2</artifactId>
           <version>1.5.1</version>
       </dependency>
   </dependencies>
   <build>
       <plugins>
           <!-- Compiler Plugin -->
           <plugin>
               <groupId>org.apache.maven.plugins</groupId>
               <artifactId>maven-compiler-plugin</artifactId>
               <version>3.8.1</version>
               <configuration>
                   <source>${java.version}</source>
                   <target>${java.version}</target>
               </configuration>
           </plugin>
           <!-- Shade Plugin to create a fat JAR -->
           <plugin>
               <groupId>org.apache.maven.plugins</groupId>
               <artifactId>maven-shade-plugin</artifactId>
               <version>3.3.0</version>
               <executions>
                   <execution>
                       <phase>package</phase>
                       <goals>
                           <goal>shade</goal>
                       </goals>
                       <configuration>
                           <createDependencyReducedPom>false</createDependencyReducedPom>
                       </configuration>
                   </execution>
               </executions>
           </plugin>
       </plugins>
   </build>
</project>
This is going to let us build this project and create a JAR that we can reference later in our CDK code.
Tip: If you are using IntelliJ, right click on this pom.xml file and select “Add as Maven Project” so that it is recognized as a Maven Project.
We can test if this JAR is built by running the following command:
cd lambda
mvn clean package
This will generate a target directory with a “lambda-1.0-SNAPSHOT.jar” that we will reference in the CDK code later.
Creating the SUT CDK Stack
Now that we have the Lambda we want to run, we can update our CDK code to create an API Gateway with Lambda Integration that uses this Lambda function. This will be the SUT CDK stack.
If you open the src/main/java/com.myorg directory, you will see two files already present. One is the app, and the other is an example stack. We will leave the example stack for later and create a new stack for our SUT. Create a file next to these two called “LoadTestSUTStack.java”:
package com.myorg;
import software.amazon.awscdk.Stack;
import software.amazon.awscdk.StackProps;
import software.amazon.awscdk.services.apigateway.LambdaIntegration;
import software.amazon.awscdk.services.apigateway.RestApi;
import software.amazon.awscdk.services.lambda.Function;
import software.amazon.awscdk.services.lambda.Runtime;
import software.amazon.awscdk.services.lambda.Code;
import software.constructs.Construct;
import software.amazon.awscdk.Duration;
public class SUTStack extends Stack {
   public SUTStack(final Construct scope, final String id, final StackProps props) {
       super(scope, id, props);
       // Define the Lambda function
       Function myLambdaFunction = Function.Builder.create(this, "MyJavaLambda")
               .runtime(Runtime.JAVA_17)
               .handler("com.myorg.lambda.SUTLambdaHandler::handleRequest")
               .memorySize(512)
               .timeout(Duration.seconds(10))
               .code(Code.fromAsset("lambda/target/lambda-1.0-SNAPSHOT.jar"))
               .build();

       // Create the API Gateway
       RestApi api = RestApi.Builder.create(this, "LoadTestApi")
               .restApiName("LoadTestAPI")
               .description("API Gateway for Load Test SUT")
               .build();
       // Create the "test" resource
       api.getRoot().addResource("test")
               .addMethod("GET", new LambdaIntegration(myLambdaFunction));
   }
}
This code defines the Lambda function and references the code we created previously. It also creates an API Gateway with a resource called “test” that has an integration with the Lambda.
Before we can deploy the stack, we also need to add it to the “LoadTestStepFunctionsDemoApp.java”:
package com.myorg;
import software.amazon.awscdk.App;
import software.amazon.awscdk.StackProps;
public class LoadTestStepFunctionsDemoApp {
   public static void main(final String[] args) {
       App app = new App();
       new LoadTestStepFunctionsDemoStack(app, "LoadTestStepFunctionsDemoStack", StackProps.builder()
               .build());
       new SUTStack(app, "SUTStack", StackProps.builder().build());
       app.synth();
   }
}
Now can run the following code in the terminal to deploy our stack:
cdk deploy SUTStackTesting the SUT Stack
Now that the SUT stack is deployed, we can run a test against it to see if it runs as expected. To do so, log in to the AWS console and go to API Gateway. Look for the API we just deployed, click on the “/test” > GET and click on the “Test” tab. There you will see a Test button:
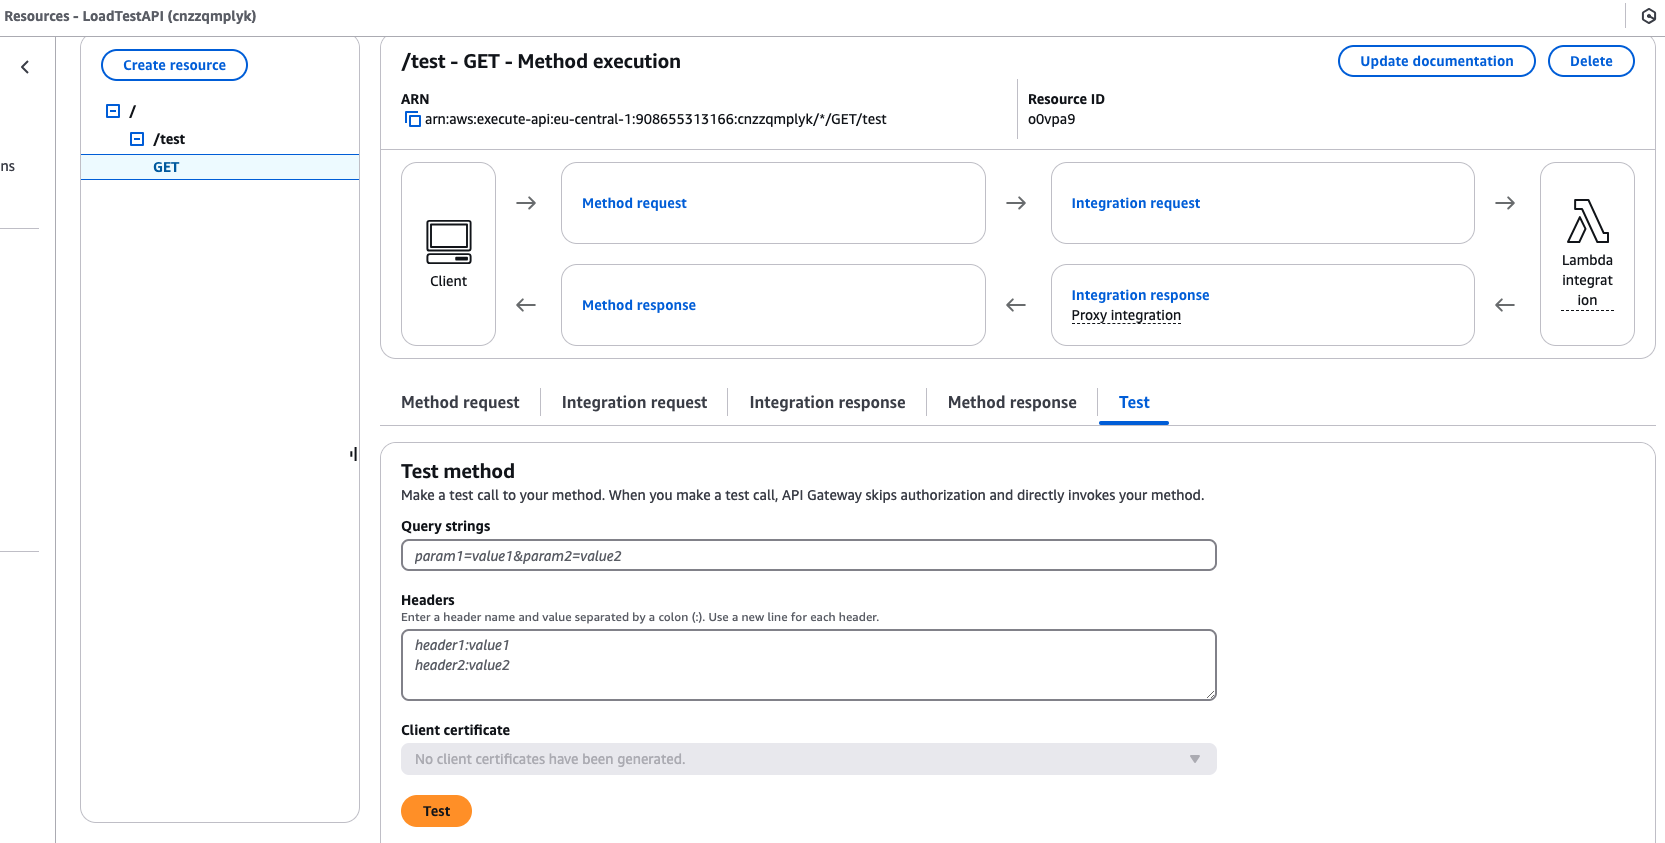
Once we click that button we should see the following result:

If for some reason you do not see this, check the Git repository for reference.
This will be the endpoint that our state function will be testing, except it will be at a much higher load.
Up next…
In this blog we have discussed why load testing is important, what a step function is and we have set up our System under test that will be tested by our load test. We have used the AWS CDK to do so. In the next part of this blog we will look into how you can design a Step Function in the AWS console, what you should consider when designing your load test and how you can deploy it from CDK once you know which steps you need.
Want to know more about what we do?
We are your dedicated partner. Reach out to us.