
This post shows you how to build an agent using Amazon Bedrock. Everything is deployed with CDK code; the sample code is available through GitHub.
A widespread use of large language models (LLMs) is creating agents. An agent can reason, decide what to do, and use tools to take action. An essential aspect of an agent is the interaction with the user. Besides calling tools for more information, it can also ask the user for more information. If the agent is missing information for one tool parameter, it can ask the user.
The use-case
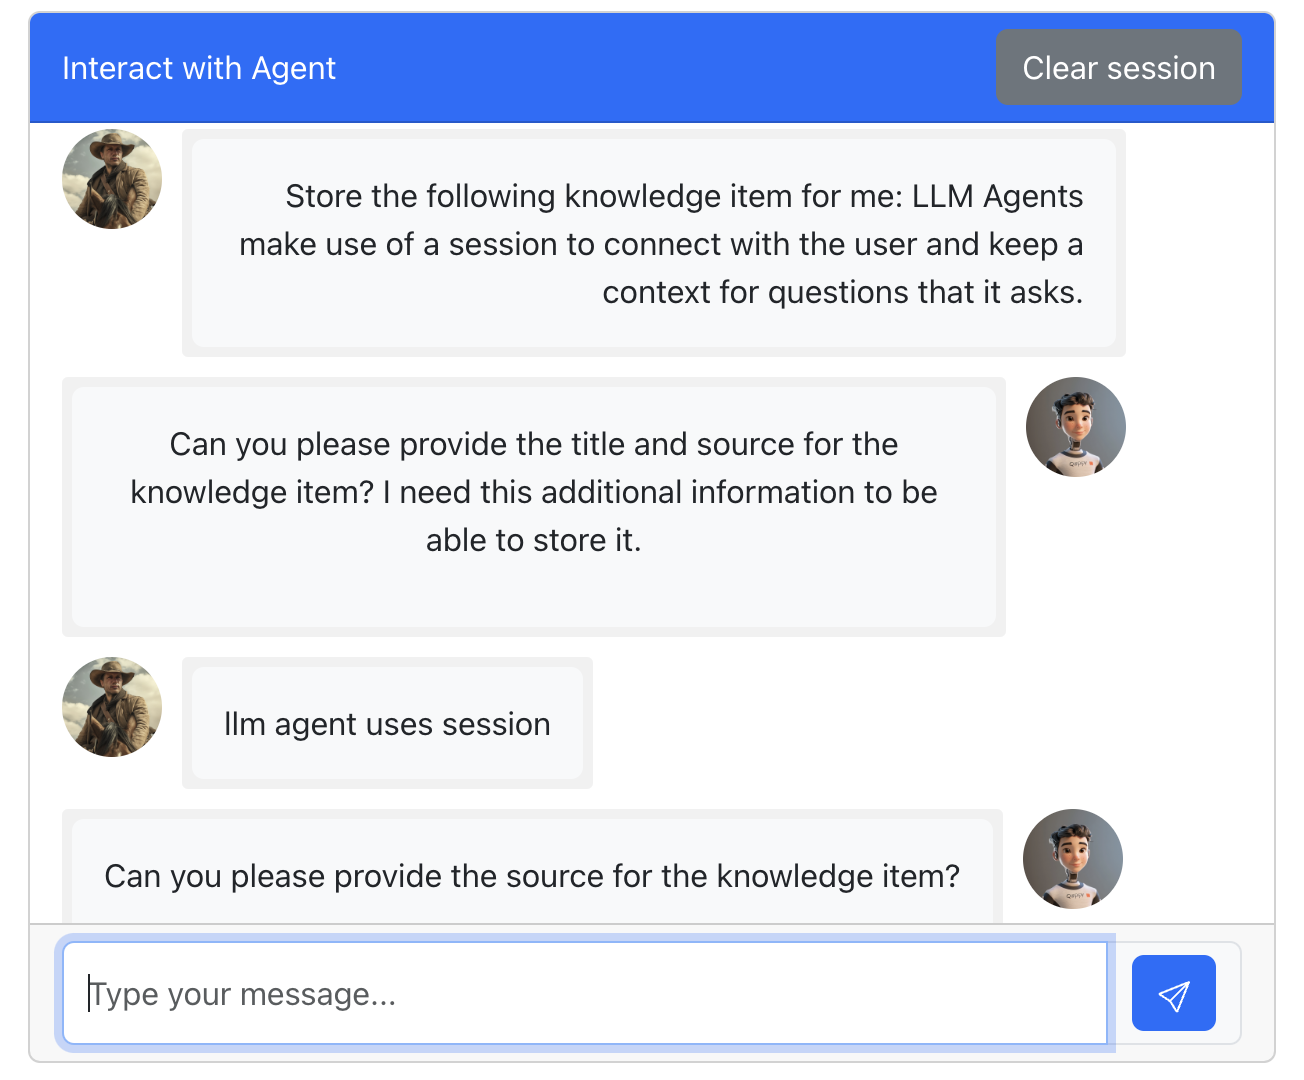
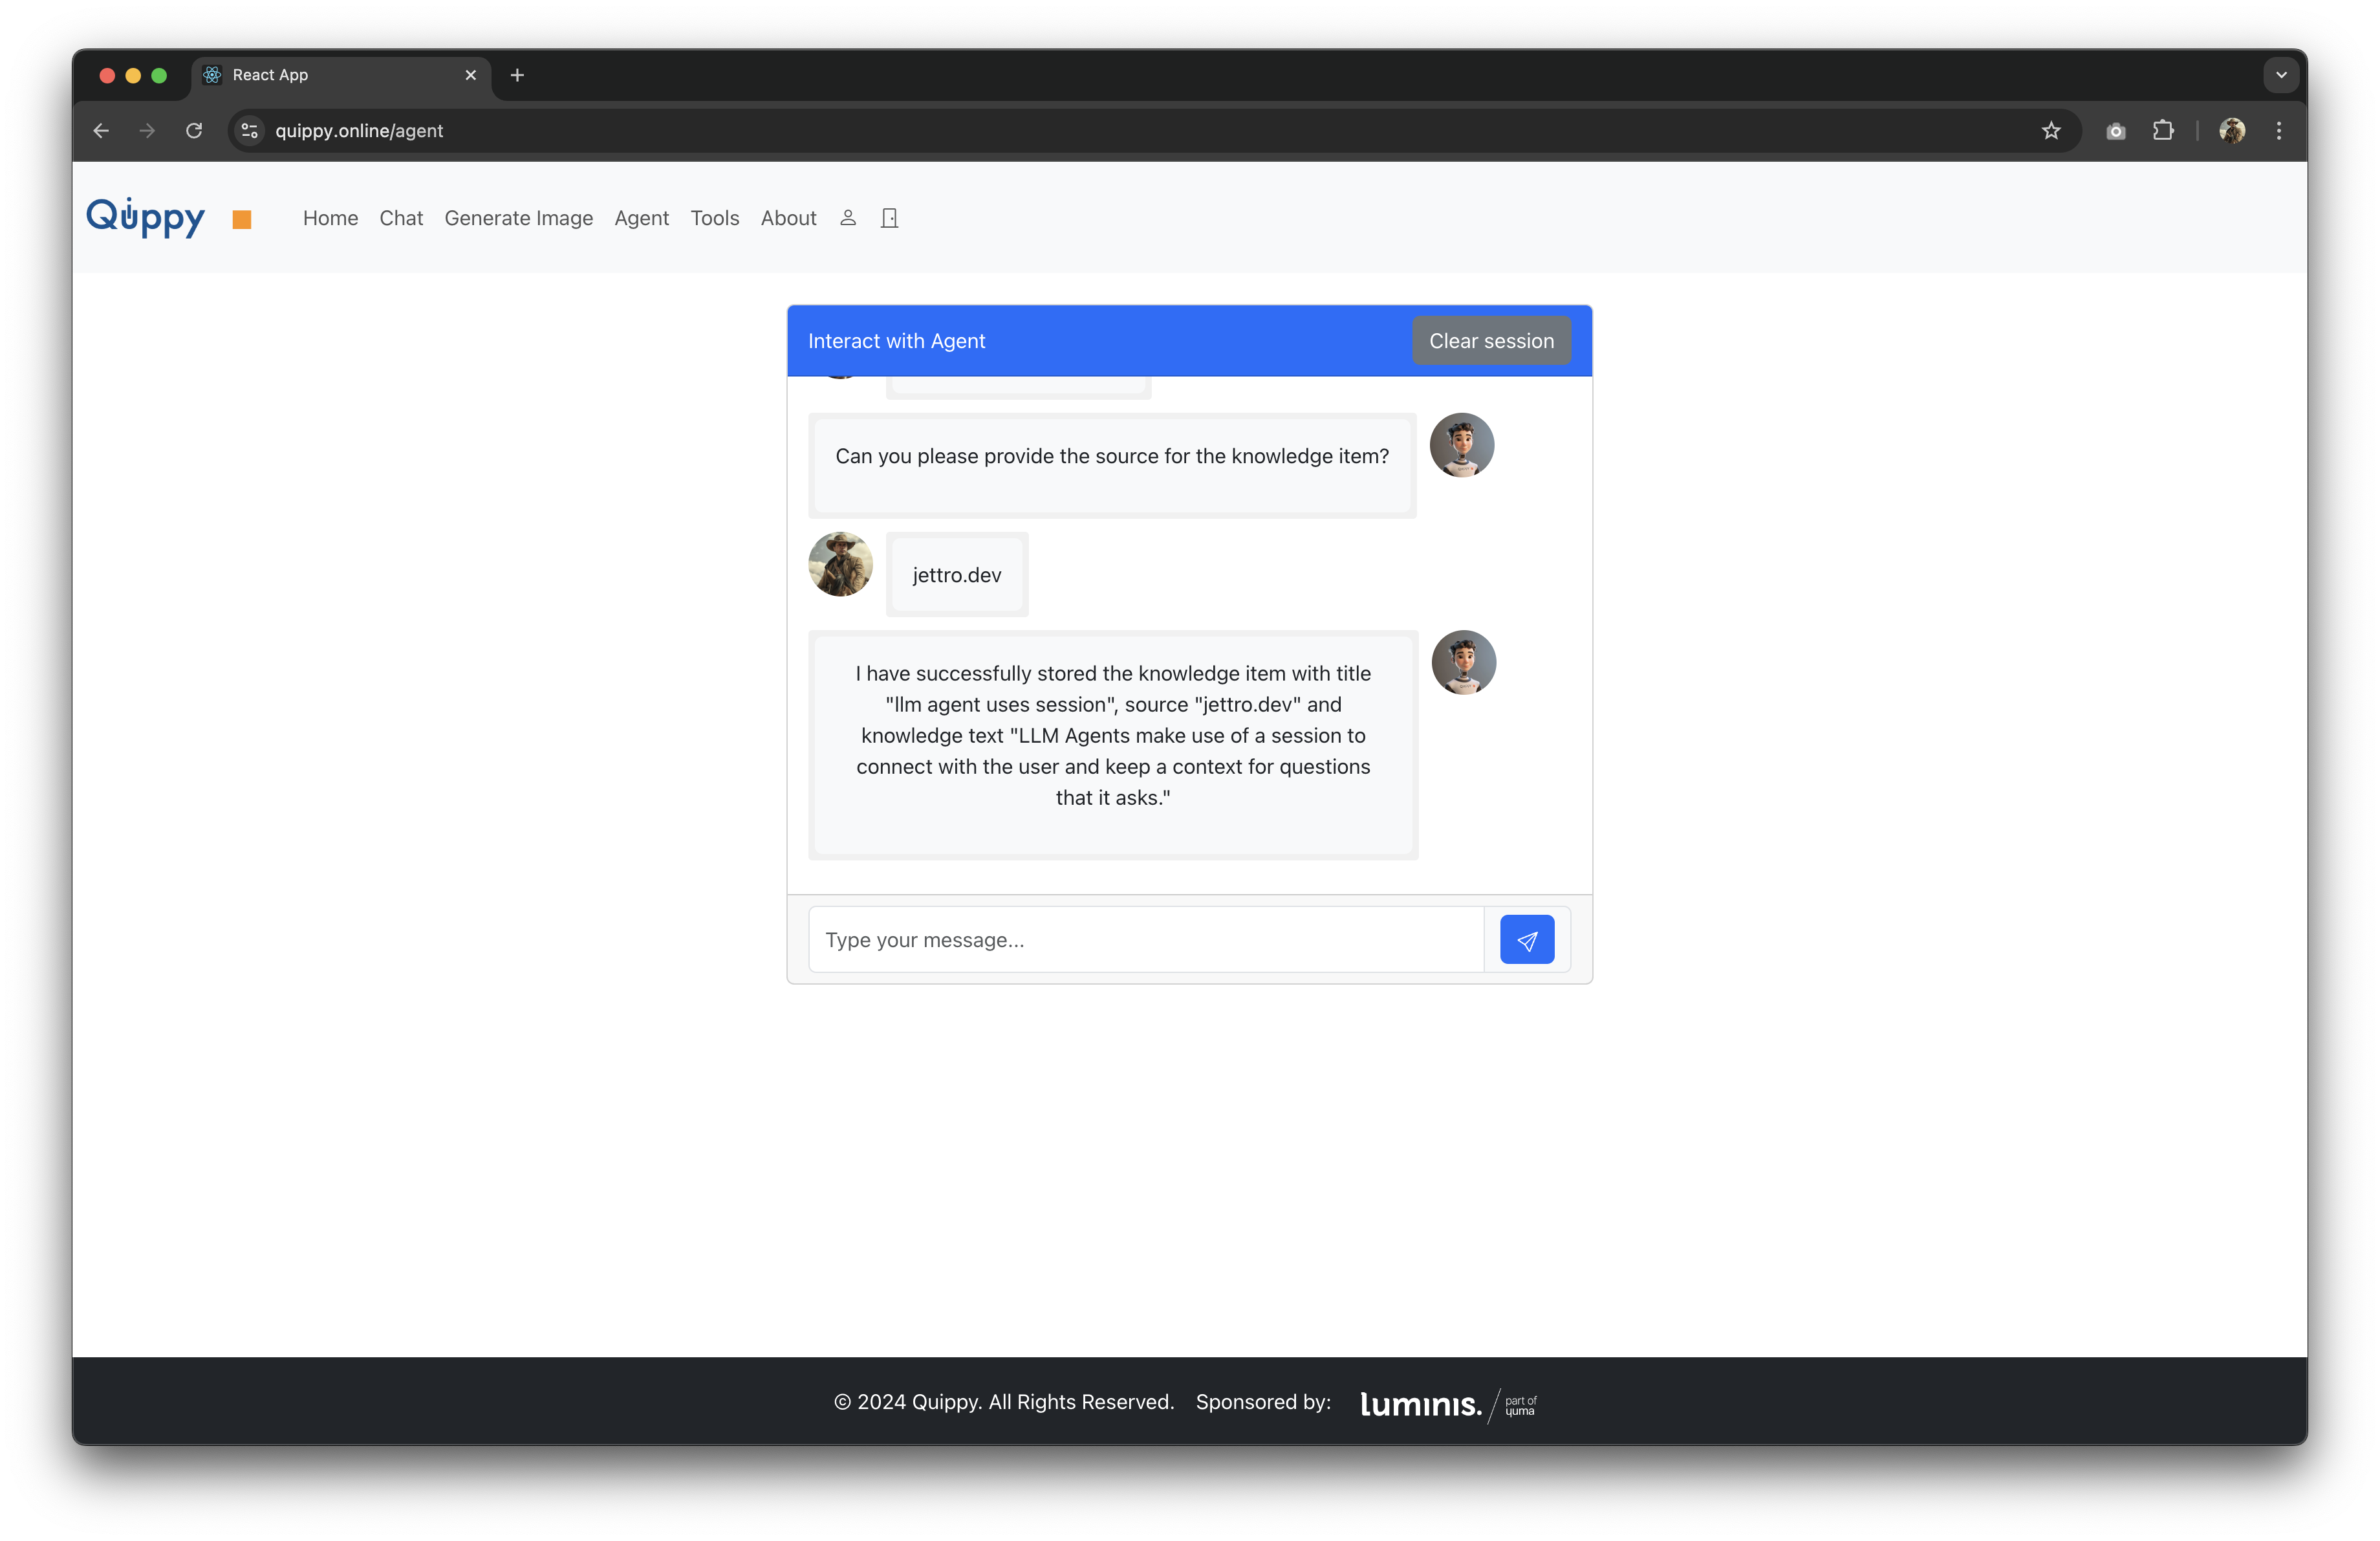
How often do you find an exciting website and gain some knowledge but later need to remember the name or URL of the site? I want to store this knowledge with a short title, description, and source. If I provide a URL, the title and description must be fetched by a tool. If I give only some knowledge, the agent must ask for the title (or suggest one) and the source of that knowledge. The agent must store the knowledge using a tool if all information is available.
A bonus is to fetch recent knowledge items using another tool.
Architecture of the solution
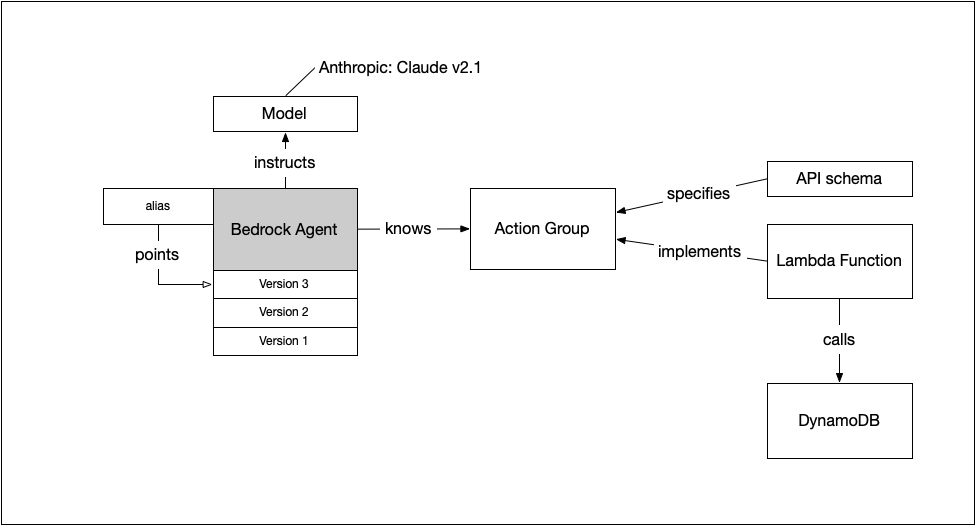
This is the solution’s architecture with the agent I used for Quippy. Everything is deployed using CDK. More on that later. First, we look at the different components that comprise the architecture.
The Bedrock Agent is the basis for the solution. You create a new version that you can test using the playground. If satisfied, update the alias to point to a new version. Your application uses the alias, so you control the version you use outside your application.
The agent uses a model to reason and generate texts. I chose Clause v2.1 from Anthropic. An agent can use a knowledge base, but I only use an action group for now. The action group is a set of tools the agent can call. A YAML file provides the specifications for the available tools. A lambda contains the implementation of the tools.
Finally, in the sample application, I store knowledge items. DynomoDB provides the storage to the Lambda.
Using a session
An agent is capable of asking a user questions for more information. An agent works differently from a chat. With a chat, you keep all information and send the complete chat as input for the next question. An agent creates a session. If an agent asks for a title, you can return the title. The agent understands it is an answer to the question it asked you.

We can provide our session ID to use the session. In the sample application, I generate a session ID and reset it after pushing the clear session button.
Using CDK for deployment
CDK is an excellent way to automate your AWS deployments. The GitHub repository contains a node project for CDK. I prefer Typescript for CDK because it has more documentation available. However, using Java or Python is also possible.
I wrote the lambda in Python. I used a layer to store the dependencies. This results in faster deployment when changing the lambda.
I like to use constructs to improve the readability of the CDK code. Below are the constructs for DynamoDB and Lambda.
export interface BedrockAgentDynamodbConstructProps extends cdk.StackProps{

}

export class BedrockAgentDynamodbConstruct extends Construct {
    public readonly knowledgeItemsTable: dynamodb.Table;

    constructor(scope: Construct, id: string, props: BedrockAgentDynamodbConstructProps) {
        super(scope, id);

        // Define the DynamoDB table
        this.knowledgeItemsTable = new dynamodb.Table(this, 'KnowledgeItemsTable', {
            partitionKey: { name: 'id', type: dynamodb.AttributeType.STRING },
            sortKey: { name: 'create_date', type: dynamodb.AttributeType.STRING },
            billingMode: dynamodb.BillingMode.PAY_PER_REQUEST,
            removalPolicy: cdk.RemovalPolicy.DESTROY, // NOT recommended for production code
        });

    }
}
import * as cdk from 'aws-cdk-lib';
import * as lambda from 'aws-cdk-lib/aws-lambda';
import * as iam from 'aws-cdk-lib/aws-iam';

import {Construct} from "constructs";

export interface BedrockAgentLambdaConstructProps extends cdk.StackProps {
    dependenciesLayer: lambda.ILayerVersion;
    tableARN: string;
}

export class BedrockAgentLambdaConstruct extends Construct {
    public readonly bedrockAgentLambda: lambda.Function;

    constructor(scope: Construct, id: string, props: BedrockAgentLambdaConstructProps) {
        super(scope, id);

        this.bedrockAgentLambda = new lambda.Function(this, 'LambdaBedrockAgent', {
            runtime: lambda.Runtime.PYTHON_3_12,
            handler: 'app.handler',
            code: lambda.Code.fromAsset('lambda/app_agent_knowledge_items_package'),
            layers: [props.dependenciesLayer],
            environment: {
                'TABLE_ARN': props.tableARN,
            },
            timeout: cdk.Duration.seconds(60),
        });

        const principal = new iam.ServicePrincipal("bedrock.amazonaws.com");

        // Add permission for Bedrock to call the Lambda function
        this.bedrockAgentLambda.addPermission("agent-invoke-lambda", {
            principal: principal,
            action: "lambda:InvokeFunction",
        })
    }
}
Note how the code requires the dependenciesLayer and the DynamoDB tableARN. The lambda allows Bedrock to use it with the addPermission construction.
Python needs to be compiled into a deployable package. It is easier to do this with a script. I use the following script to compile the lambda and deploy the stack.
#!/bin/bash

set -e  # Exit immediately if a command exits with a non-zero status.

# Directory where the lambda functions are located
LAMBDA_DIR="lambda"

# Create a package directory for the dependencies layer
LAYER_DIR="$LAMBDA_DIR/dependencies_layer"
mkdir -p "$LAYER_DIR"

# Export dependencies using Poetry
poetry export -f requirements.txt --output $LAYER_DIR/requirements.txt

# Install dependencies into the layer directory
pip install -r $LAYER_DIR/requirements.txt -t $LAYER_DIR/python

# Create a package directory for each lambda function
for app in $(ls $LAMBDA_DIR/*.py); do
    # Get the base name of the lambda function (e.g., app1, app2)
    app_name=$(basename "$app" .py)

    # Create a directory for the packaged lambda
    package_dir="$LAMBDA_DIR/${app_name}_package"
    mkdir -p "$package_dir"

    # Copy the lambda function into the package directory
    cp $LAMBDA_DIR/$app_name.py $package_dir/app.py

    echo "Packaged $app_name in $package_dir"
done

# Deploy the CDK stacks
cdk deploy
In the next code block, I show you the stack configuration for these two components.
import * as cdk from 'aws-cdk-lib';
import * as lambda from 'aws-cdk-lib/aws-lambda';
import {Construct} from 'constructs';
import {bedrock} from '@cdklabs/generative-ai-cdk-constructs';
import {BedrockAgentLambdaConstruct} from "./constructs/bedrock-agent-lambda-construct";
import {BedrockAgentDynamodbConstruct} from "./constructs/bedrock-agent-dynamodb-construct";
import {AgentActionGroup} from "@cdklabs/generative-ai-cdk-constructs/lib/cdk-lib/bedrock";
import * as path from "node:path";

export class QuippyCdkAgentStack extends cdk.Stack {
    constructor(scope: Construct, id: string, props?: cdk.StackProps) {
        super(scope, id, props);

        const bedrockAgentTable = new BedrockAgentDynamodbConstruct(this, 'BedrockAgentDynamodbConstruct', {});

        // Create a Lambda Layer for dependencies
        const dependenciesLayer = new lambda.LayerVersion(this, 'DependenciesLayer', {
            code: lambda.Code.fromAsset('lambda/dependencies_layer'),
            compatibleRuntimes: [lambda.Runtime.PYTHON_3_12],
            description: 'A layer to include dependencies for the Lambda functions',
        });

        const bedrockAgentLambda = new BedrockAgentLambdaConstruct(this, 'BedrockAgentConstruct', {
            dependenciesLayer: dependenciesLayer,
            tableARN: bedrockAgentTable.knowledgeItemsTable.tableArn,
        });

        // Grant the Lambda function permissions to access the DynamoDB table
        bedrockAgentTable.knowledgeItemsTable.grantReadWriteData(bedrockAgentLambda.bedrockAgentLambda);
    }
}
The next section explains the lambda. We now continue with the CDK code for the Bedrock Agent.
const agent = new bedrock.Agent(this, 'Agent', {
    foundationModel: bedrock.BedrockFoundationModel.ANTHROPIC_CLAUDE_V2_1,
    instruction: 'You are a helpful and friendly agent that assists in storing knowledge items. ' +
        'There are two tools you can use. One uses a URL as input. That tool obtains more information ' +
        'about the URL like the title and the knowledge provided by the website from the URL. The ' +
        'other tool takes the title, source and knowledge to store it somewhere.',
    enableUserInput: true,
    shouldPrepareAgent: true
});
Note the configuration of the instruction and the foundational model. We tell the agent that it is allowed to ask the user for more input.
Our agent needs an action group to gain access to the tools.
const actionGroup = new AgentActionGroup(this, 'KnowledgeItemActionGroup', {
    actionGroupName: 'store-knowledge-items-action-group',
    description: 'Use these functions to get more information about a url and to store knowledge items.',
    actionGroupExecutor: {
        lambda: bedrockAgentLambda.bedrockAgentLambda
    },
    actionGroupState: "ENABLED",
    apiSchema: bedrock.ApiSchema.fromAsset(path.join(__dirname, 'action-group.yaml')),
});

agent.addActionGroups([actionGroup]);
The tools are defined through the action-group.yaml file. Check the GitHub repo for this file. Below is only one part of the file configuring the tool to obtain more information about a URL.
openapi: 3.0.3
info:
  title: Knowledge Items API
  description: Actions that Bedrock Agents can take to complete and store knowledge items. Use the continuation token to obtain the next page of knowledge items.
  version: 1.1.1
paths:
  /find-url:
    post:
      summary: Use the URL to obtain a title and the knowledge.
      description: Use the URL to obtain a title and the knowledge.
      operationId: find-url
      requestBody:
        content:
          application/json:
            schema:
              type: object
              properties:
                url:
                  type: string
      responses:
        '200':
          description: URL found
          content:
            application/json:
              schema:
                type: object
                properties:
                  source:
                    type: string
                  title:
                    type: string
                  knowledge:
                    type: string
Finally, we create the alias for the active version.
const agentAlias = agent.addAlias({
    aliasName: 'knowledge-item-agent-alias',
    description: 'alias for my agent handling knowledge items',
})
The lambda
The action group has access to a lambda, which translates the request from the action group into a call to the right tool. The specifications for the available tools are in the YAML file I discussed before. A lambda receives an event and a context. The event contains the required information for the lambda to call the tools. It includes the name of the tools or, in our case, the path. It also includes all the parameters that the yaml files specify.
def handler(event, context):
    agent = event['agent']
    action_group = event['actionGroup']
    api_path = event['apiPath']
    logger.info(f"Calling function with API path: {api_path}")

    parameters = event.get('requestBody', {}).get('content', {}).get('application/json', {}).get('properties', [])
    if not parameters:
        logger.warning("No parameters found in the event")
    else:
        logger.info(f"Calling with parameters: {parameters}")


    if api_path == '/find-url':
        # One parameter with the name url of type string
        url_to_find = next((param['value'] for param in parameters if param['name'] == 'url'), None)
        function_response = json.dumps(find_url_details(url_to_find))
    elif api_path == '/store-knowledge':
        logger.info("About to store the knowledge")

        # Extract the relevant parameters using next() or handle if not found.
        knowledge_value = next((param['value'] for param in parameters if param['name'] == 'knowledge'), None)
        title = next((param['value'] for param in parameters if param['name'] == 'title'), None)
        source = next((param['value'] for param in parameters if param['name'] == 'source'), None)

        # create knowledge
        function_response = json.dumps(store_knowledge(title=title, knowledge=knowledge_value, source=source))
    elif api_path == '/list-knowledge':
        logger.info("About to list the knowledge")
        num_items = next((param['value'] for param in parameters if param['name'] == 'num_items'), 10)
        continuation_token = next((param['value'] for param in parameters if param['name'] == 'continuation_token'), None)
        function_response = json.dumps(list_knowledge(num_items, continuation_token))
    else:
        function_response = f"API Path is unknown {api_path}"

    response_body = {
        "application/json": {
            "body": function_response
        }
    }

    action_response = {
        'actionGroup': action_group,
        'apiPath': api_path,
        'httpMethod': 'POST',
        'httpStatusCode': 200,
        'responseBody': response_body
    }

    method_response = {'response': action_response, 'messageVersion': event['messageVersion']}
    logger.info("Response: {}".format(method_response))

    return method_response
Again, the complete code is in the GitHub repository.
Debugging the agent
Debugging the lambda with the agent and the action group can be challenging. I usually start by logging the event. Then, I compare the input with the specification in the YAML file, and the same goes for the response.
An advantage of the lambda is that you can change it on the fly while debugging. The lambda logs are available, so adding more of them helps a lot.
The Amazon Bedrock Agent’s playground or test environment is an excellent feature. Here, you can play around with the agent before releasing it. You can check all the agent steps using the trace feature.

Integrating the agent in Quippy
Quippy is my playground environment for Amazon Generative AI. I use the agent in a React app, which integrates with AWS API Gateway and Cognito to secure the environment. Lambdas utilized by API Gateway call the Bedrock Agent using the Agent ID and the Agent Alias ID. I am planning on releasing this repository later this year as well.
I hope you like this post on how to build an agent using Amazon Bedrock. You can find the GitHub repository here.
Want to know more about what we do?
We are your dedicated partner. Reach out to us.